It is accessed through the “Explore” button on the exploration screen. Since all the data is recorded, it is necessary to enter the patient's card and the examination card.
It is displayed full screen.
It has 3 well-defined areas:
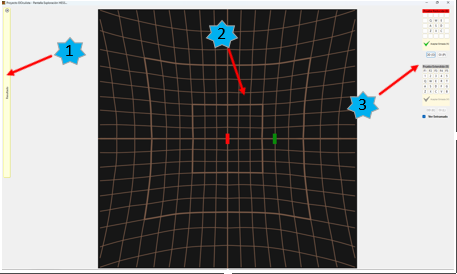
- Results Dashboard (1).
It is initially minimized, accessing it by simply pressing it.
If the left area of the panel is pressed, it closes or opens according to its previous situation.
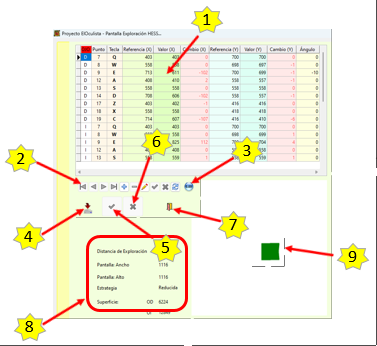
It has the following elements:
- List of explored points and their answers (1).
- Browser (2).
It allows scrolling through the different responses, as well as editing and selective deletion. If a position has not been well executed, it can be deleted here and repeated.
- “Initialize” button (3).
Allows you to delete all the answers entered in the list. You must do the whole scan again..
- “Save Data” button (4).
Don't forget to press it.
If you exit the screen before saving, you will lose all scan data.
In addition, it starts the process of calculating the surface of the response polygon.
- “Ok” button (5).
Once the exploration is done and the data is saved, press this button to exit. Do NOT exit by closing the window with the Windows menu.
- “Cancel” button (6).
To exit without saving anything.
- “Exit” buttom (7).
It also allows you to return to the main form. Data is retained if it has been processed (unlike "cancel", which causes all scan data to be lost).
- Information panel (6).
We can see here the data of the exploration carried out: exploration distance, width and height of the screen used, strategy and surface of the response polygon.
- Graphic area (7).
Its purpose is to calculate the surface of the response polygon.
- Exploration Area (2).
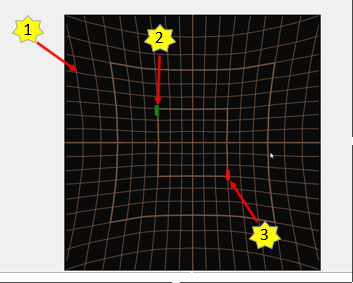
In it you will see the background (1) with the color you have chosen and the witnesses (2) (3).
The patient witness is moved by putting the mouse on it and pressing the left mouse button on it. When he is in the desired position, just release the left button and he will stay there.
The scanner witness is placed in its position by pressing the corresponding key. This witness cannot move freely on the screen, its positions are predefined.
The screen lattice is visible or not depending on your preferences..
- Scan Type Panel (3).
Here you have 2 panels that correspond to the 2 types of possible tests:
- “Reduced Test” panel.
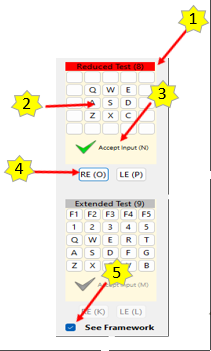
It consists of:
· Headboard (1).
It is active if its background is red.
To activate it, if it was deactivated (gray background) just press it.
· Positions Panel (2).
You have the 9 positions of this type of test, as well as its corresponding letter.
The color of each letter is black if it has not been explored and turns red when the corresponding position is explored and validated (PRESSING F12). So you can know the scanned positions of the eye with the scan in progress.
· "Accept input" button (3).
Once a point has been scanned, either the F12 key or this button must be pressed, so that the answer is saved and another point can be scanned.
· Eye button to explore (4).
Allows you to select the eye to explore. Scan points always refer to the selected eye.
· View "Lattice" selector (5).
Makes the screen lattice visible or invisible.
- “Extended Test” Panel.
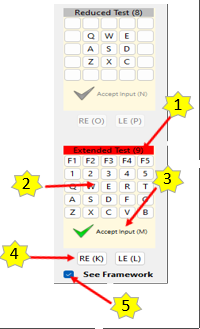
It consists of:
· Headboard (1).
It is active if its background is red.
To activate it, if it was deactivated (gray background) just press it.
· Positions Panel (2).
You have the 25 positions of this type of test, as well as its corresponding letter.
The color of each letter is black if it has not been explored and turns red when the corresponding position is explored and validated (PRESSING F12). So you can know the scanned positions of the eye with the scan in progress.
· "Accept input" button (3).
Once a point has been scanned, either the F12 key or this button must be pressed, so that the answer is saved and another point can be scanned.
· Eye button to explore (4).
Allows you to select the eye to explore. Scan points always refer to the selected eye.
· View "Lattice" selector (5).
Makes the screen lattice visible or invisible.
