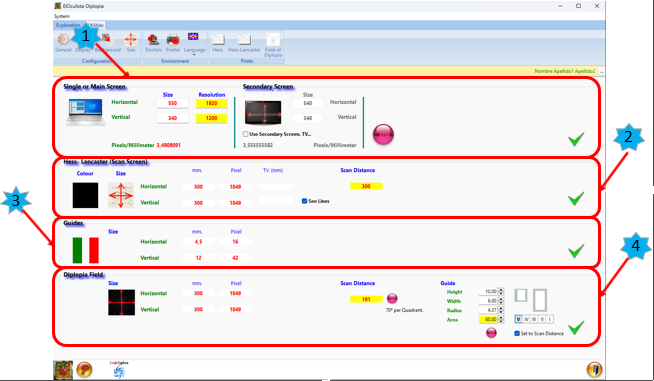
This screen contains all the accesses that access the different configuration screens of the program.
It is divided into 4 zones:

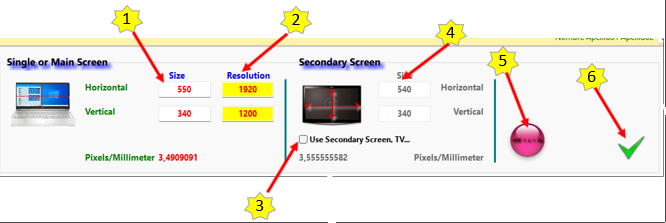
1. Configuration of the Computer Display and Secundary Display, if any (1).
It consists of the following elements:

- Computer screen settings.
There are 4 entrances.
To the left to enter the size of the computer screen in millimeters (1).
To the right to enter the resolution of the computer screen (2). The latter are calculated by the program automatically when you press the "Calculate" button (5), so there is no need to enter their value.
In addition, the proportion of pixels per millimeter of this screen is shown.
- Secondary Display Settings.
If we have a computer with a small screen we will not be able to carry out the exploration. We must therefore use a secondary screen, which can be a monitor or a television.
We have in this area:
- Selector for “Use Secondary Screen, TV…” (3).
- Inputs to enter the size of the secondary screen in millimeters (4).
It is only active if we have selected "Use Secondary screen, TV ...".
The pixels per millimeter ratio is also shown here (it is updated when the "Calculate" button is pressed).).
- Calculate button (5).
Once the data has been entered, it must be pressed to calculate the screen resolution and the pixels/mm ratio.
- OK button (6).
Pressing it validates the data and saves it to be used by default in the following sessions.
2. Hess Screen Setup (2).
We have the following elements:

- Color button (1).
To select the background colour of the scanning screen.
- Size button (2).
To set the size of the scanning screen.
- Current size of the computer screen in millimeters and pixels, as well as of the secondary screen, if any, in millimeters.
- “View Lines” selector (3).
To set by default whether or not the Hess screen grid will be visible or not. However, in the exploration screen itself it can also be activated or not.
- Current Scan Distance.
- “OK” button (4).
Pressing it validates the data and saves them to be used by default in the following sessions.
3. Guides Configuration (3).
It has the following elements:

- button “Guide 1" (1).
To change the colour of tell-tale 1 and the size of both tell-tales.
- Button "Guide 2" (2).
To change the colour of core 2 and the size of both cores.
- Information about the current size of the tokens in millimetres and pixels.
- Accept" button (3).
Pressing this button validates the data and saves them to be used by default in the following sessions.
4. Diplopia Field Screen Setting (4).
The following elements are available:

- Information on the size of the scanning screen in millimetres and pixels.
- Information on the recommended scanning distance, taking into account the size of the scanning screen and that it can have an extension of 70°.
- Button "Calculate scanning distance..." (1).
This button is used to set the optimum scanning distance, so that the given size set on the scanning screen covers 70° of scanning.
- Inputs for setting the size of the token (2).
We can modify if the token is a rectangle its height and width, if it is a circle its radius. We can also enter the area and the size is calculated automatically. For the calculations to be performed, the "Set to scanning distance" selector must NOT be selected.
- Button to select the default shape of the token (3).
A choice between a rectangle or a circle can be made.
- Button to select the default Color of the token (4).
- Goldmann preset Token size selector (5).
These can be chosen from size V to I, although sizes III, II and I are too small.
- Selector for the entered data to be adjusted to the set scanning distance (6).
- Calculate" button (7).
To calculate the size of the core according to the entered area.
- Accept" button (8)
Pressing this button validates the data and saves it for use as default in the following sessions.
