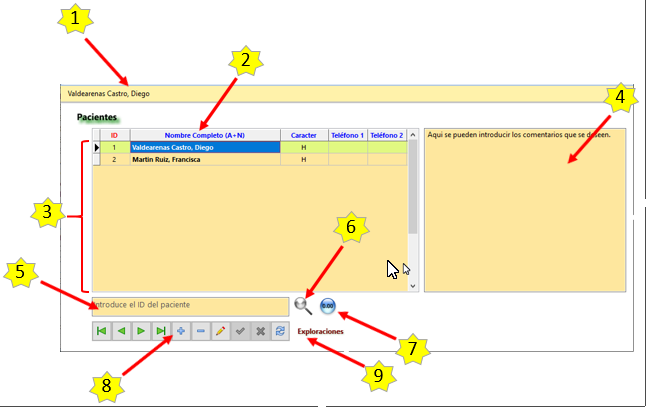
It is accessed by choosing “Scan”, “Scan Type” and “Digital”. It has the following elements:

- Active patient, indicates the patient that is currently selected (1).
- Patient list.
It consists of 2 parts:
- Header, in which the fields that make up the list are exposed (2).
The list is ordered according to one of the following fields: ID, Full Name, Telephone 1 and Telephone 2. The active order at any given time is known because its title is in Red. To change the order, just click on the name of the desired field from the 4 available.
- List itself.
The selected patient is highlighted in green background (3).
- Field dedicated to comments … (4).
- Search field, here the data is entered to search for a patient in the list (5).
The lookup data must match that of the active field. For example: if the ID field is active, the search is by ID and therefore we must enter a number. If the "Full Name (A + N)" field is active, we must enter the surnames and the name of the patient separated by a "," and a space. It is NOT necessary to enter the last name and full name. If we enter “Valde” it will look for the first record whose surname begins with “Valde”.
- Button to start the search (6).
- Button to initialize the search field (7).
The search field is initialized.
- Browser (8).
It has the necessary buttons to:
- Move through the list.
- Add a patient.
- Delete a patient.
- Edit the data of a patient.
- Reset the list.
- “Examinations” button, with which you access the examinations screen (9).
