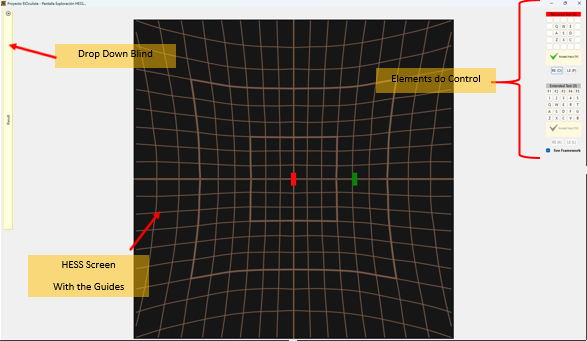
The following elements are available to facilitate the scanning task:
· Hess screen. Its size and background color is set by default and cannot be changed during scanning. The lattice can be displayed or not at any time. The tokens are visible with the color and size of configuration.
· Drop-down curtain. Located on the left side, it has all the elements to monitor the test. A list with the results obtained and scanning data: scanning distance, screen size, strategy used and surface in pixels of the parallelogram formed by the data obtained.
· Elements for the development of the test. Choice of the type of test, buttons with the keys associated with each scanning point and buttons to choose the eye to be scanned.
The following scanning sequence has been established:
· Choose the type of test: reduced or extended. By default, the strategy recorded in the tab is activated, but it can be changed here, if deemed convenient.
· Select the eye to be scanned.
· Press the key corresponding to the point to be scanned. Once the scanning of the point has been completed, the data obtained must be saved temporarily until the end of the test. When the point is completed, the color of the associated key changes to red.
· Complete all points.
· Open the data curtain.
· Check that the entries are correct, with the possibility of deleting or modifying a point and rescanning it.
· Save the data.
· Accept the screen.

Annexes D-01, D-02 and D-03 show the characteristics and drawing of this screen.
