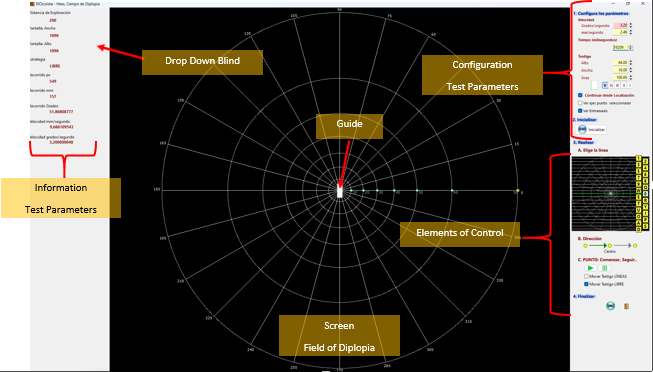
It is divided into 3 zones:
· Left, where there is an information panel indicating the scanning distance, the width and height of the screen and the type of strategy being used (free). In addition, there is also a control that indicates the horizontal center of the screen, useful to properly position the patient's head.
· Central, where the screen for scanning the diplopia field itself is located. The lattice that configures it cannot be modified, but the scanning radii, the size of the tokens, the direction of token movement and the angular velocity with which the tokens move can be modified.
· The right-hand side, which contains the buttons necessary to cover the different tasks during scanning. A control panel has been included that allows:
- Configurator of the test parameters, including:
§ Velocity in degrees per second.
§ Velocity in millimetres per second.
§ Time to travel a radius.
§ Height and width of the token.
§ Area of the token.
§ Witness shape selector: rectangle or oval.
§ Selector for common Goldmann sizes: V, IV, III, II and I.
§ Selector to choose whether stopping the token continues the movement from the beginning or from the current location.
§ Selector to view the axes of the selected point.
§ Selector for displaying and hiding the test grid.
- Button to completely initialize the test.
- Command area for the execution of the test including:
§ Panel with scan lines and corresponding activation key: 1, 2, 3, 4, 5, 6, 7, 8, 9, Q, W, 0, E, R, T, Y, U, I, O, P, A, S, and D.
§ Selector for the direction of movement of the token: from outside to centre or from centre to outside.
§ Circles to position the token on the right edge, in the centre or on the left edge.
§ Commands to start, stop and continue the movement of the telltale.
§ Selector to choose the possibility to move the token along the lines or completely free.
§ Commands to mark the position of the token according to the selected test type: Field of View (Left->F3, Right->F4), Binocular Field (Left->F5, Right->F6) and Diplopia Field (Left->F7, Right->F8),
§ Command to end each point.
§ Command to accept the scan.
- Button to print a graph to show the result of each point of the test.
Annexes G-01, G-02, G-03, G-04 and G-05 provide the characteristics and drawing of this screen.

