To establish the diplopia field, the patient must be able to differentiate which eye the image seen by the witness corresponds to. To do this, as indicated above, a filter should be placed over one eye, usually the red one over the right eye. Each line of the screen must be mapped and the left and right limits of the field studied must be detected. The witness is placed in as extreme a position on the line as possible, so that he/she cannot be seen. The patient is instructed to try to look at it. The witness moves from the outside to the inside, until a point is reached where he/she can be looked at. It should be specified whether it is seen as single or double. In a normal diplopia field, it will begin to be possible to look at the most temporal area, which is only possible with only one eye: the token will be seen in the colour of the same side as the scanning side. As it moves towards the middle, there comes a moment when it is looked at by both eyes: if there is no diplopia, the witness will be seen with a fainter and brighter shade of red, as it is the mixture of both eyes (white and red). If diplopia is present, two separate tokens will be seen. The area where the binocular field of gaze begins should be marked and in the case of diplopia, which begins at that point. The token continues to move towards the middle and the patient should continue to look at it. The area where diplopia begins shall be marked on its left and right edge, if any.
This procedure must be repeated until all lines are completed.
In the designed system the steps are as follows:
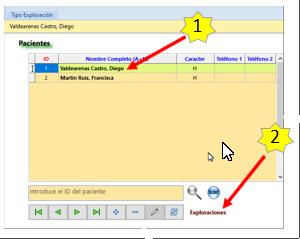
1. Selecting the patient (1).
2. Access the 'Explorations' screen. (2).
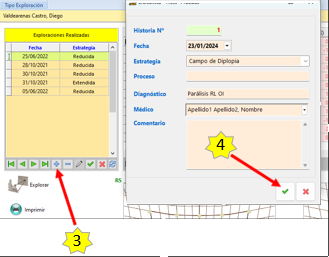
3. Add a scan (3) indicating the type of strategy we will use: 'Diplopia Field' and accept (4).
The following options are modified according to our choice.
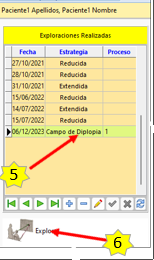
4. Select Scan (5) and access the scanning screen by pressing the corresponding 'Scan' button. (6).
5. Position the patient at the appropriate scanning distance, with the red lens in the right eye..
6. On the scanning screen:
- Choose the type of field to be performed: Field of gaze (7), binocular (8) and/or diplopia (9). Any combination of the 3 types can be chosen (0). Depending on the mode chosen, the scanning is more or less flexible.


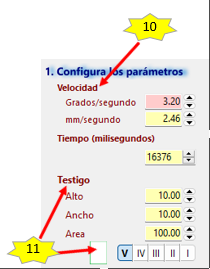
- Choose the speed at which the telltale will move, by default 3.2 degrees second. (10).
- Choose the size of the core, as well as its shape (11).
- Inicializar la prueba (12).

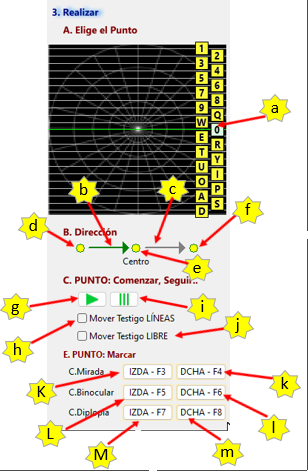
- Select the line to be scanned by pressing the corresponding key or by pressing the line selector (a).
- Choose the direction of movement of the token. This is usually from the outside towards the middle of the screen. The position should be so extreme that initially the patient cannot look at the token (b) (c) (d) (e) (f).
- Commence movement of the baton, either manually or automatically (g).
- Set the left-hand position at which the (uniocular) token, which shall be seen by one eye only, starts to be reached with the corresponding key, F3 key (Field of View), if this type has been chosen (K).
- Set the position where the binocular field starts from the left, key F5 (Binocular Field), if this type has been chosen (L).
- Set the position where the diplopia starts from the left, key F7 (Diplopia Field), if this type has been chosen (M).
- Move the telltale to the right of the line and select the direction of movement of the telltale from outside to inside (b).
- Set the right position at which the baton (uniocular), which shall be seen by one eye only, starts to be reached with the corresponding key, F4 key (Field of View), if this type has been chosen (k).
- Set the position where the binocular field starts from the right, key F6 (Binocular Field), if this type has been chosen (l).
- Set the position where the diplopia starts from the left, F8 key (Diplopia Field), if this type has been chosen (m).
- Save the positions of the line by pressing the F12 key.
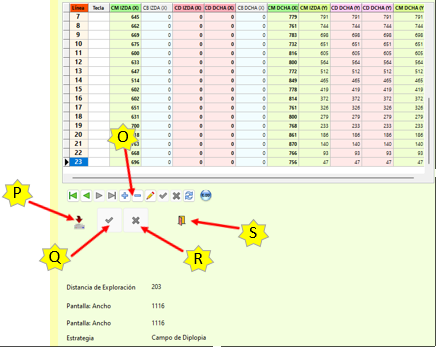
- Browse all lines (23).
- End the scan by pressing the enter key (N).

- Open the 'Results' tab.
- If you want to scan a point again, you can delete your entry and scan that point again (0).
- If everything is correct, the test data must be saved (P).
- Press the 'OK' button to update the database (Q).
- Press the 'Cancel' button if you do not want to save anything and lose all data (R).
- Press the 'Exit' button, to access the 'Scans' screen. (S).
