You must follow the following steps:
1. Choose the background color of the exploration screen, press the 'Color' button and you will go to the background color selection screen (1).
2. Choose the size of the exploration screen, press the 'Size' button and you will go to the exploration screen size selection screen (2).
3. Select 'View Lines' if you want to see the screen grid (3).
4. Enter the scanning distance. This distance is automatically calculated when resizing the scan screen if desired. Otherwise, it can be entered manually (4).
5. Validate the data by pressing the corresponding "Accept" button (5).

Set the COLOR of the background of the Browse Screen
By pressing the “Color” button (0) you access the screen to configure the background color and the color and size of the indicators. The change background button (1) is in Blue, which indicates that all color changes will be in the background. Follow the next steps:
1. Choose an approximate color in the usual selector (2).
2. Adjust the color with the RGB selector (3).
3. Press "Accept" to validate the color (4).

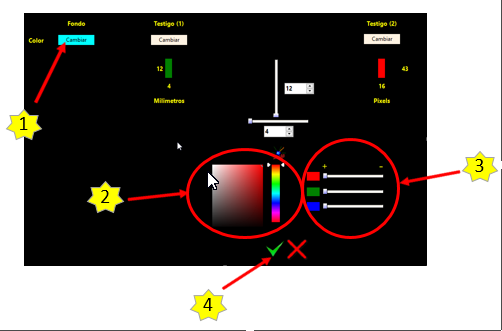
Remember that by pressing "Accept" you will return to the general configuration screen and there you must press "Accept" again (5) so that the data is recorded and available the next time the program is used.

Set the SIZE of the browse screen
Follow the next steps:
1. Access the size configuration screen by pressing the “Size” button (0).

2. Choose the mode you want to use to indicate the size of the browsing screen:
· Mode 1 or semi-automatic ((Press the “Mode 1” Button (1)).
You use a red indicator that you move around the screen and it indicates the resulting size of the screen in millimeters.
· Mode 2 or direct (Press the “Mode 2” Button (2)).
In this method you directly enter the size you want.
3. Using Mode 1:

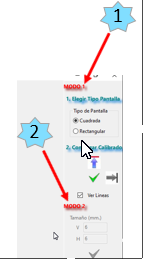
· Press the “Mode 1” button (0), the necessary elements are activated to be able to automatically enter the size.
· Choose whether the screen will be square or rectangular (1). Square is recommended. If you choose square, vertical resizing will be available. If you choose rectangular, horizontal and vertical resizing will be available.
· Press the “Vertical Position” Button (2). The cursor will appear in the center of the screen. It is a red and horizontal rectangle.

· Place the mouse over the cursor. Press the left mouse button and "catch" it.
· Move the cursor vertically, up or down, without releasing the left mouse button. You will notice that, next to the cursor, the size in millimeters that the screen would have appears. Size 0 is at the bottom edge of the screen.

· When you get the size you want, release the left mouse button.
· You can repeat this action as many times as you need.
· Press the “Accept” Button (3). The “Save Size” Option will be available. In addition, you will see the screen data in pixels and millimeters.
· Choose if you want the size of the Witnesses and the scanning distance to automatically adjust to the size of the scanning screen (4).
· Press “Save data” (5).
· Press “Back to main configuration screen” (6).
4. Using Mode 2:
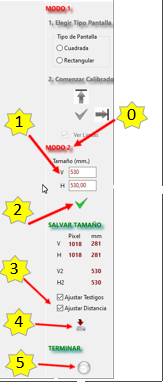
· Press the “Mode 2” button, the elements necessary to manually enter the size of the exploration screen (0) are activated.
· Enter the vertical and horizontal size (1).
· Press the “Accept this size” button (2).
The “Save Size” Option will be available.
In addition, you will see the screen data in pixels and millimeters.
· Choose whether you want the size of the Witnesses and the scanning distance to automatically adjust to the size of the scanning screen (3).
· Press “Save data” (4).
· Press “Back to main configuration screen” (5).
5. Click "OK" in the general configuration screen, section "Screen Scan" to save the chosen size. (3).

Display or not the grid of the exploration screen
During scanning, the scanning screen lattice may or may not be visible. To change your status:
1. Select or not the “View Grid” option in the general configuration screen, “Exploration Screen” section (0).
2. Click “OK” in the same section to activate and save the option (1).

Change the COLOR of the guides
To change the color of a token, follow these steps:
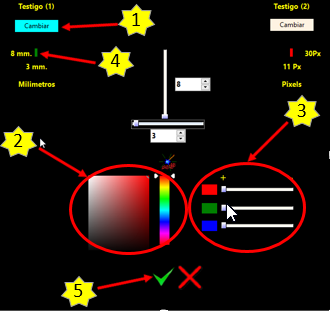
1. On the General Settings screen, “Guides” section, press the button corresponding to the guide you want to change: 1 (1) or 2 (2). You access the screen to configure the background color and the color and size of the guides. The Guide (1) or Guide (2) button is set to Blue (1), indicating that all color changes will be on that Guide.

2. Choose an approximate color in the usual selector (2).
The chosen Button reflects the selected color instantly.
3. Adjust the color with the RGB selector (3).
The chosen Baton reflects the selected color instantly (4).
4. Press "Accept" to validate the color (5). You return to the general configuration screen.
5. Press "Accept" in the general configuration screen, section "Guides", in this way the data is recorded and is available the next time the program is used (3).

Change the SIZE of the guides
Para cambiar el tamaño de los testigos:
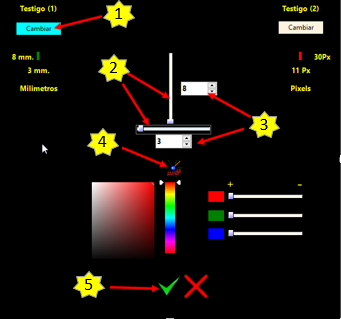
1. On the General Settings screen, “Guides” section, press the button corresponding to the guide you want to change: 1 (1) or 2 (2). You access the screen to configure the background color and the color and size of the guides. The guide (1) or guide (2) button is in Blue (1). In this case, the chosen size affects the 2 tokens equally.
Guide1 reflects size changes in millimeters.
Guide 2 reflects the size changes in pixels.

2. Slide the vertical or horizontal bars until you get the desired size in millimeters or pixels (2).
3. Or enter the desired value in millimeters (3) in the corresponding fields.
4. Press the “Usual Size” button if you want the program to calculate the size according to the screen size (4).
5. Press the “VALIDATE witness and background configuration” button (5). You return to the general configuration screen.
6. Press "Accept" in the general configuration screen, section " tokens ", in this way the data is recorded and is available the next time the program is used (3).
When there is a secondary screen, the reflected size is what it would be on the primary screen, so that the real size is obtained on the secondary screen.
